Build GIT - Learn GIT (P1)
If you are reading this post, you probably are using Git or want to use Git. I am a big fan of Git and also those posts where people implement some piece of an existing technology in order to understand how their work in the core. Point being that if you have implemented something, you obviously know how it works, right? This is one such post written to spread my love for Git. Yes, we'll implement Git!...in JavaScript.
This part implements basics of the following concepts:
- Repository.
- Commit.
- Commit chaining.
- Branch.
All the code written is available in a Github repo:
What is Git?
There is a very simple definition of Git at kernel.org:
Git is best thought of as a tool for storing the history of a collection of files.
Yeah, that is essentially why one uses Git...to maintain a history of changes in a project.
Repository (repo)
When you want to use Git in your project, you create something called a Repository. Now we could refer the Git documentation which defines a repo as follows:
A collection of refs together with an object database containing all objects which are reachable from the refs, possibly accompanied by meta data from one or more porcelains. A repository can share an object database with other repositories via alternates mechanism.
Well, that is too much to grasp, isn't it? And that is not what we are here for. So lets make things simple.
Consider a Git repository as a collection of everything related to Git. So when you make a project folder a Git repo, Git basically creates some of its internal stuff there and encapsulates them into it. Having said that, lets make a simple class called Git which will basically represent a repo.
function Git(name) {
  this.name = name; // Repo name
}
Great! Now making a repo simply requires us to instantiate the Git class passing in the name of the repo:
var repo = new Git("my-repo");

// Actual command:
// > git init
Commit
Next concept one needs to know about is a Commit. In very simple terms, a commit is a snapshot of your project's contents. It is these commits which when chained together form the history of your project.
From the looks of it, a simple Commit class would have and id to reference it and a change containing the snapshot of change made. Understanding how a change is actually stored is beyond the scope of this implementation. So lets drop the change part and assume that every commit has the change with it:
function Commit(id) {
  this.id = id;
  // Assume that 'this' has a 'change' property too.
}
In Git, when you commit after making some changes, you can give it a message which describes the change you are commiting. This is called the commit message which we'll add to our Commit class:
function Commit(id, message) {
  this.id = id;
  this.message = message;
}
Lets add the ability on our Git class to create a commit or commit (verb):
Git.prototype.commit = function (message) {
  var commit = new Commit();
  return commit;
};
We add a function called commit on the Git prototype. It accepts a string message, creates a new Commit instance and returns it. Note that we are not passing in anything yet in the Commit constructor. We need an id to give to the new commit. We'll make the Git class keep track of the commit ids by keeping a counter called lastCommitId with it:
function Git() {
  this.lastCommitId = -1;
}
Note: In actual Git, commit id is a 40-hexdigit number also called as "SHA-1 id". But for keeping things simple we are using integers here.
The commit function can now pass a new id (incremented) along with the message in the constructor:
Git.prototype.commit = function(message) {
  var commit = new Commit(++this.lastCommitId, message);
  return commit;
};
We can now commit anytime like so:
repo.commit("Make commit work");

// Actual command:
// > git commit -m "Make commit work"
Match your code
At this point you should have your implementation that looks like the one here. I have wrapped the whole code in an Immediately invoking function expression (IIFE) and exposed the Git class manually to keep global space clean.
Commit history - chaining the commits
Git has a command called log which shows the commit history in reverse chronological order, i.e. first the lastest commit followed by previous ones.
Lets implement this log command as a method on our Git class. Our log function will return an array of commits in reverse chronological order.
Here is a simple test which should pass for our log function:
console.log("Git.log() test");
var repo = new Git("test");
repo.commit("Initial commit");
repo.commit("Change 1");

var log = repo.log();
console.assert(log.length === 2); // Should have 2 commits.
console.assert(!!log[0] && log[0].id === 1); // Commit 1 should be first.
console.assert(!!log[1] && log[1].id === 0); // And then Commit 0.
Onto the implementation.
Git.prototype.log = function () {
  var history = []; // array of commits in reverse order.

  // 1. Start from last commit
  // 2. Go back tracing to the first commit
  // 3. Push in `history`

  return history;
};
The log function has only pseudo code right now in form of comments which tell us the logic of the function. To implement such logic 2 requirements arise:
- We need to know the last commit.
- Every commit should somehow know which commit was made before it.
We have a failing test case right now:
Lets take up the first requirement: Knowing the last commit.
Git has something called a HEAD. In actual Git it is simply a pointer to your current branch. But since we have not covered branches yet, we'll relax the definition here...temporarily.
What we'll do is add a property called HEAD in the Git class which will reference the last commit's Commit object:
function Git(name) {
  this.name = name; // Repo name
  this.lastCommitId = -1; // Keep track of last commit id.
  this.HEAD = null; // Reference to last Commit.
}
HEAD will be updated everytime a commit is made i.e. in the commit() function.
Git.prototype.commit = function(message) {
  // Increment last commit id and pass into new commit.
  var commit = new Commit(++this.lastCommitId, message);

  // Update HEAD and current branch.
  this.HEAD = commit;

  return commit;
};
Simple! Now we always know which was the last commit made.
Getting on the 2nd requirement: Every commit should somehow know which commit was made before it. This brings up the concept of parent in Git. Commits in Git are kept together in form a data structure called Linked Lists. Simply put, in a Linked List every item stores with itself a pointer to its parent item. This is done so that from every item, we can reach its parent item and keep following the pointers to get an ordered list. This diagram from Wikipedia will will make more sense:
For this, we add a property called parent in the Commit class which will reference its parent commit object:
function Commit(id, parent, message) {
  this.id = id;
  this.parent = parent;
  this.message = message;
}
The parent commit also needs to be passed into the Commit constructor. If you think, for a new commit what is the parent/previous commit? Yes, the current commit or the HEAD.
Git.prototype.commit = function (message) {
	// Increment last commit id and pass into new commit.
	var commit = new Commit(++this.lastCommitId, this.HEAD, message);
Having our requirements in place, lets implement the log() function:
Git.prototype.log = function () {
  // Start from HEAD
  var commit = this.HEAD,
    history = [];

  while (commit) {
    history.push(commit);
    // Keep following the parent
    commit = commit.parent;
  }

  return history;
};

// Can be used as repo.log();
// Actual command:
// > git log
Our test should pass now:
Match your code
At this point our code looks like this.
Next up is Branches!
Branches
Hurray, we have reached at the most interesting & powerful feature of Git: Branches. So what is a Branch and what is it used for?
Imagine this scenario, you are working on a project making commits now and then. At some point may be you or one of your teammate wants to experiment something on your current work, say a different algorithm. You could surely keep making those experimental commits, but remember this was your experiment and hence not guaranteed to be kept in the main project. This way you polluted your main project.
Branches to the rescue. What you need to do here is branch out from your current line of commits so that the commits you make do not pollute the main line of development.
To quote the definition at kernel.org:
A "branch" is an active line of development. The most recent commit on a branch is referred to as the tip of that branch. The tip of the branch is referenced by a branch head, which moves forward as additional development is done on the branch. A single git repository can track an arbitrary number of branches
Lets understand what a branch is. A branch is nothing but a mere pointer to some commit. Seriously, that is it. That is what makes branches in Git so lightweight and use-n-throw type. You may say HEAD was exactly this. You are right. The only difference being that HEAD is just one (because at a given time you are only on a single commit) but branches can be many, each pointing to a commit.
The 'master' branch
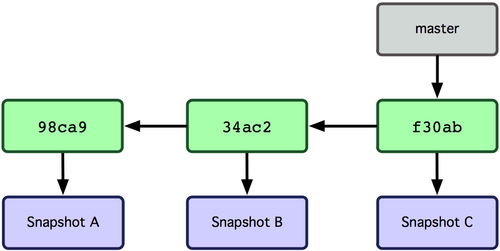
Each Git repo when initialized comes with a default branch called master. Lets understand branches through some diagrams from git-scm.com:
You create a new repository and make some commits:
Then you create a new branch called testing:
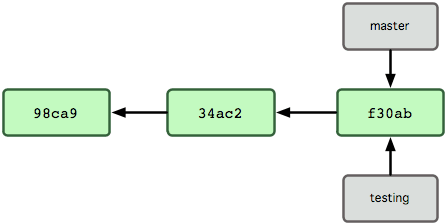
Nothing much, just a new pointer called testing to the lastest commit.
How does Git know which branch you are on? Here comes the HEAD. HEAD points to the current branch:
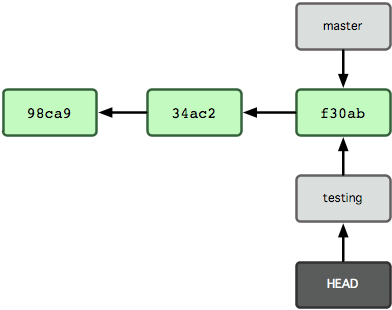
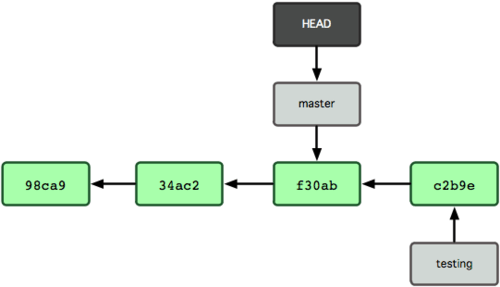
Now comes interesting part. Being on testing branch you make a commit. Notice what happens:
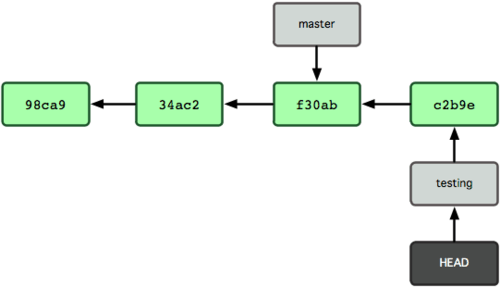
From now on, the testing branch/pointer only moves and not master. Looking at the above diagram and keeping our log() algorithm in mind, lets see what history would each branch return.
-
testing branch: Currently we are on testing branch. Moving backwards from
HEAD(commit c2b9e) and tracking the visible linkages, we get the history as:
|c2b9e| -> |f30ab| -> |34ac2| -> |98ca9| -
master branch: If we switch to master branch, we would have a state as follows:
Now tracing back from HEAD gives us the history as:
|f30ab| -> |34ac2| -> |98ca9|
You see what we acheived? We were able to make some experimental changes/commits without polluting the main branch (master) history using branches. Isn't that cool!!!
Enough said, lets code. First lets make a new class for a branch. A branch, as we saw, has a name and a reference to some commit:
function Branch(name, commit) {
  this.name = name;
  this.commit = commit;
}
By default, Git gives you a branch called master. Lets create one:
function Git(name) {
  this.name = name; // Repo name
  this.lastCommitId = -1; // Keep track of last commit id.
  this.HEAD = null; // Reference to last Commit.

  var master = new Branch("master", null); // null is passed as we don't have any commit yet.
}
Remember we changed the meaning of HEAD in the beginning as we were still to cover branches? Its time we make it do what its meant for i.e. reference the current branch (master when repo is created):
function Git(name) {
  this.name = name; // Repo name
  this.lastCommitId = -1; // Keep track of last commit id.

  var master = new Branch("master", null); // null is passed as we don't have any commit yet.

  this.HEAD = master; // HEAD points to current branch.
}
This will require certain changes in the commit() function as HEAD is no longer referencing a Commit but a Branch now:
Git.prototype.commit = function(message) {
  // Increment last commit id and pass into new commit.
  var commit = new Commit(++this.lastCommitId, this.HEAD.commit, message);

  // Update the current branch pointer to new commit.
  this.HEAD.commit = commit;

  return commit;
};
And a minor change in log function. We start from HEAD.commit now:
Git.prototype.log = function () {
	// Start from HEAD commit
	var commit = this.HEAD.commit,
Everything works as before. To really verify what we deduced in theory by calculating history of those 2 branches above, we need one final method on our Git class: checkout.
To begin with, consider checkout as switching branches. By default we are on master branch. If I do something like repo.checkout('testing'), I should jump to testing branch...provided it is already created. But if its not created already, a new branch with that name should be created. Lets write a test for this method.
console.log("Git.checkout() test");
var repo = new Git("test");
repo.commit("Initial commit");

console.assert(repo.HEAD.name === "master"); // Should be on master branch.
repo.checkout("testing");
console.assert(repo.HEAD.name === "testing"); // Should be on new testing branch.
repo.checkout("master");
console.assert(repo.HEAD.name === "master"); // Should be on master branch.
repo.checkout("testing");
console.assert(repo.HEAD.name === "testing"); // Should be on testing branch again.
This test fails right now as we don't have a checkout method yet. Lets write one:
Git.prototype.checkout = function (branchName) {
  // Check if a branch already exists with name = branchName
};
The comment in above code requires that the repo maintains a list of all created branches. So we put a property called branches on Git class with initially having only master in it:
function Git(name) {
  this.name = name; // Repo name
  this.lastCommitId = -1; // Keep track of last commit id.
  this.branches = []; // List of all branches.

  var master = new Branch("master", null); // No commit yet, so null is passed.
  this.branches.push(master); // Store master branch.

  this.HEAD = master; // HEAD points to current branch.
}
Continuing with the checkout function now. Taking first case when we find an existing branch, all we need to do is point the HEAD, the current branch pointer, to that existing branch:
Git.prototype.checkout = function (branchName) {
  // Loop through all branches and see if we have a branch
  // called `branchName`.
  for (var i = this.branches.length; i--; ) {
    if (this.branches[i].name === branchName) {
      // We found an existing branch
      console.log("Switched to existing branch: " + branchName);
      this.HEAD = this.branches[i];
      return this;
    }
  }

  // We reach here when no matching branch is found.
};
I returned this from that method so that methods can be chanined. Next, incase we don't find a branch with the passed name, we create one just like we did for master:
Git.prototype.checkout = function(branchName) {
  // Loop through all branches and see if we have a branch
  // called `branchName`.
  for (var i = this.branches.length; i--; ) {
    if (this.branches[i].name === branchName) {
      // We found an existing branch
      console.log("Switched to existing branch: " + branchName);
      this.HEAD = this.branches[i];
      return this;
    }
  }

  // If branch was not found, create a new one.
  var newBranch = new Branch(branchName, this.HEAD.commit);
  // Store branch.
  this.branches.push(newBranch);
  // Update HEAD
  this.HEAD = newBranch;

  console.log("Switched to new branch: " + branchName);
  return this;
};

// Actual command:
// > git checkout existing-branch
// > git checkout -b new-branch
Eureka! Now our checkout tests pass :)
Now the grand moment for which we created the checkout function. Verifying the awesomeness of branches through the theory we saw earlier. We'll write one final test to verify the same:
console.log("3. Branches test");

var repo = new Git("test");
repo.commit("Initial commit");
repo.commit("Change 1");

// Maps the array of commits into a string of commit ids.
// For [C2, C1,C3], it returns "2-1-0"
function historyToIdMapper(history) {
  var ids = history.map(function (commit) {
    return commit.id;
  });
  return ids.join("-");
}

console.assert(historyToIdMapper(repo.log()) === "1-0"); // Should show 2 commits.

repo.checkout("testing");
repo.commit("Change 3");

console.assert(historyToIdMapper(repo.log()) === "2-1-0"); // Should show 3 commits.

repo.checkout("master");
console.assert(historyToIdMapper(repo.log()) === "1-0"); // Should show 2 commits. Master unpolluted.

repo.commit("Change 3");
console.assert(historyToIdMapper(repo.log()) === "3-1-0"); // Continue on master with 4th commit.
This test basically represents the diagrams we saw earlier explaining the working of branches. Lets see if our implementation is inline with the theory:
Wonderful! Our implementation is right. The final code for this part can be found in GIT repo: git-part1.js.
Whats next?
Next I plan to implement concepts like merging (Fast-forward and 3-way-merge) and rebasing of branches.
I had a lot of fun writing this and hope you enjoyed it too. If you did, share the Git love with others.
Till next time, bbye.
References
- https://git-scm.com/book/en/ (Where I learned Git from)
- https://www.kernel.org/pub/software/scm/git/docs/gitglossary.html
Update: Join the discussion on HN.
